
How to Disable Laptop Keyboard? – Many causes of problems arise on the keyboard of your laptop, ranging from dust, splashing water, damaged software, or even virus attack.
These conditions may make You stress. Many of your tasks are messy because you have to use your device every day.
Well.
You only need to come to a laptop repair service in your city.
Or maybe we can postpone it.
Because of the cost to replace a new laptop keyboard is not as we imagine. Or maybe you don’t have the free time to go there?
You can do these tips on how to disable the laptop keyboard. I’m pretty sure you can, doing this trick is not difficult.
How to Disable Laptop Keyboard in Windows 10
The following are effective ways to turn off or disable laptop keyboards that have errors in Windows 10:
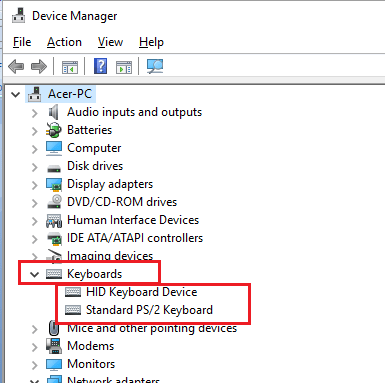
- Go to Device Manager by right-clicking This PC on the Desktop, clicking Properties, then clicking Device Manager (alternative: right-click on the Windows 10 logo in the lower-left corner, continue clicking Device Manager).
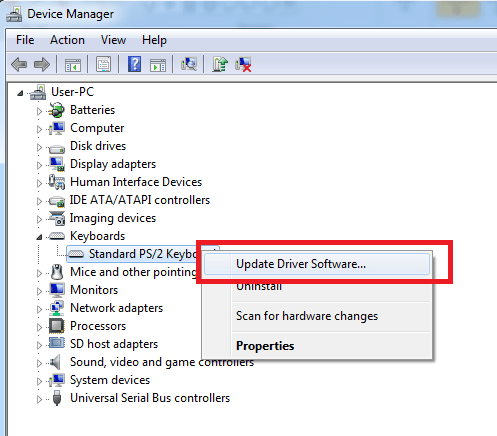
- In the Device Manager window, click the arrow on the Keyboard icon to bring up the keyboard driver details used.
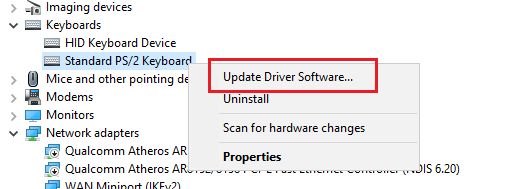
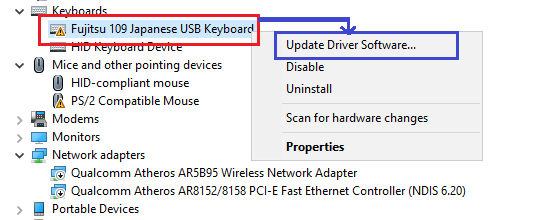
- Right-click on the keyboard driver (according to your laptop driver), then click Update Driver Software.
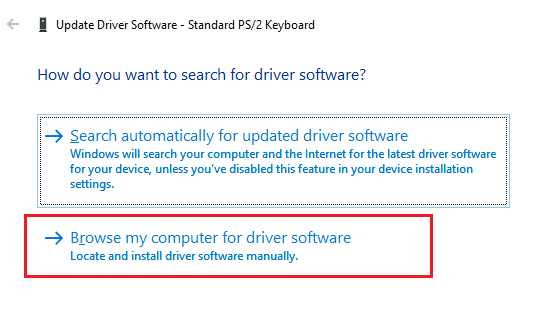
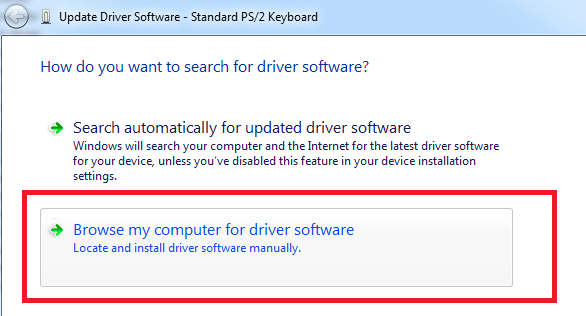
- Click on Browse my computer for driver software.
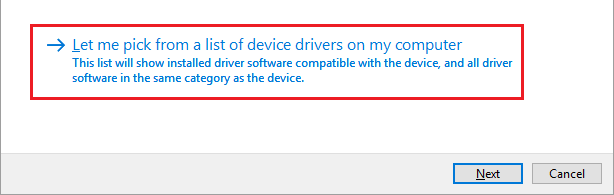
- Click on the post. Let me pick a list of device drivers on my computer.
- Uncheck the option Show Compatible Hardware and select it in the box below one of the drivers that are INCOMPATIBLE with your laptop. That is, if yours is Acer, don’t install Acer drivers, but install drivers other than Acer, for example, Samsung, Fujitsu, or others.
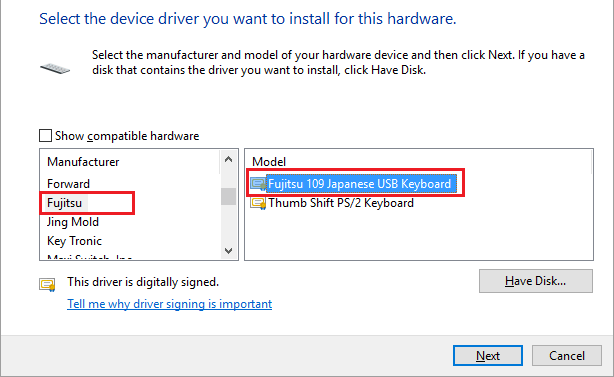
- Don’t forget, also click on the keyboard MODEL option in the right box.
Note: BRANDS OR THE KEYBOARD MODEL DOES NOT BE THE SAME AS YOUR LAPTOP KEYBOARD. For example, my laptop is Acer, and then I installed the FUJITSU brand keyboard driver with a choice of the Fujitsu 109 Japanese USB Keyboard model (different from the ACER brand original keyboard with the STANDARD PS / 2 KEYBOARD model).
Choosing a different brand of the keyboard but with the same model, will also make efforts to disable the keyboard not work, because it is still compatible. Therefore, choose a different or inappropriate manufacturing BRAND and MODEL.
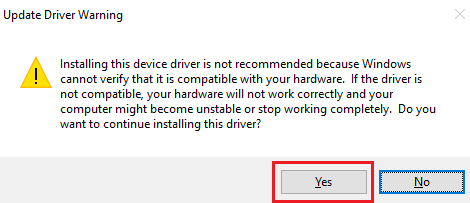
- After clicking Next, a warning will appear that the installed driver is not compatible with the device. Just click YES, because indeed we intentionally installed incompatible drivers.
- After completing the installation, Windows 10 will display a message that the installation process has finished and end by clicking Close.
- Lastly, when Windows 10 prompts you to restart the laptop/netbook. And don’t forget, when the computer restarts, please install an external keyboard and external mouse because the keyboard or touchpad on the notebook/laptop will not work anymore.
How to Disable Laptop Keyboard in Windows
7 & 8
- Enter the Device Manager by clicking the Start button and proceed with Right-clicking on the Computer icon and selecting Properties and clicking Device Manager. (or you can look for it in the search box on the start menu)
- In the Device Manager window, click on the Keyboard arrow to make the details of the keyboard driver visible.
- Right-click on the keyboard driver (adjust to your laptop driver), then click Update Driver Software.
- The next step, click on Browse my computer for driver software.
- Click on the post. Let me pick a list of device drivers on my computer.
- Uncheck the option Show compatible hardware and select one of the INCOMPATIBLE drivers with your laptop. That is, if your device is Acer, don’t install Acer drivers, but install drivers other than Acer like Samsung, Fujitsu, Key Tonic, and others. For example, I installed the Fujitsu 109 Japanese USB Keyboard driver on an Asus notebook. Click Next.
- After you click Next, a warning will appear that the installed driver is not compatible with the device. Just click YES, because indeed we intentionally installed incompatible drivers.
- After completing the installation, Windows 7 will display a message that the installation process is complete and click Close.
- If Windows 7 asks you to restart your laptop/netbook, then reboot. And don’t forget, when the computer restarts, please install an external keyboard and external mouse because the keyboard or touchpad on the notebook/laptop will not work anymore.
- Now the internal keyboard for your notebook/laptop is already disabled. You can use an external keyboard and mouse without having to be bothered by an internal keyboard and laptop touchpad.
How to Re-Activate the Internal Keyboard
- Go to the Device Manager with right-clicking on the This PC, select Properties, select Device Manager (alternative: Windows 10 logo right in the bottom left corner, click Device Manager).
- After entering the Device Manager window, in Windows 10 the keyboard driver (and mouse driver) will appear that is not compatible (marked with an ‘exclamation mark’ in the yellow triangle).
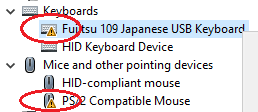
- Right-click on the keyboard driver that is not compatible (the top red circle), then click Update software driver.
- After the following box appears, click on Browse my computer for driver software.
- In the next window, click let me pick from a list of device drivers on my computer.
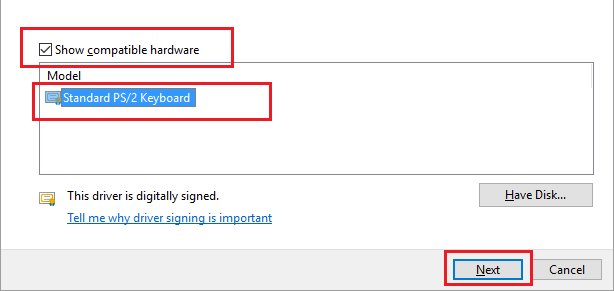
- Next, the window will open the driver and keyboard model. If previously when you turn off your laptop keyboard, you have to uncheck the Show compatible hardware, then here we have to check the box provided. The checkmark appears, leave it and continue to click on the keyboard model that is available in the table below. Click until the colour changes to blue, as shown below. After that, end by clicking Next.
- Wait a while until the installing process is complete. If you have, a notification will appear that the driver update process has been successful—end by clicking close.
- Until here, you have finished returning or re-enabling the internal keyboard of your laptop. This process should also automatically reactivate the laptop’s touchpad or internal mouse.
But, if the laptop’s internal touchpad or mouse isn’t active (usually on Windows 10), you don’t need to worry. Activate the laptop’s internal mouse by performing similar steps when reactivating the internal keyboard, as follows:
How to Reuse the Laptop TouchPad
- Enter Device Manager by right-clicking on This PC, select Properties, select Device Manager (or right-click the Windows logo 10 in the lower-left corner, choose Device Manager).
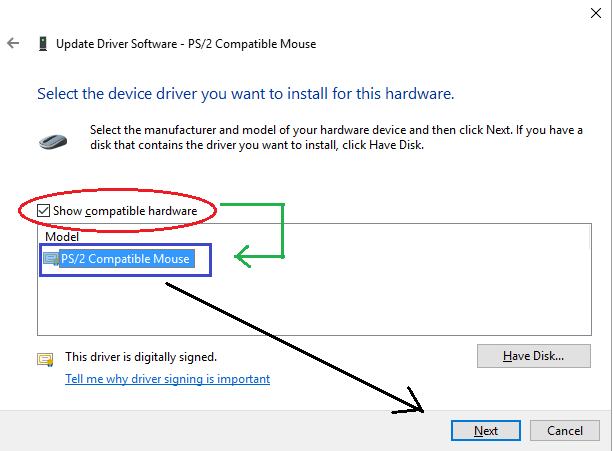
- Click Mice and Other Pointing Devices, and continue right-clicking on compatible mouse exclamation marks on the orange triangle (blue box in the image below), and continue clicking Update Driver Software.

- In the next window, click Browse My Computer for Driver Software.
- Then select let me pick from a list of device drivers on my computer.
- Put a checkmark on Show Compatible Hardware. But if the checkmark has appeared by itself, leave it and continue to click the compatible mouse model below (click until highlighted and change colour to blue). If so, continue clicking Next.
- Then wait until the installing process is complete. If a notification appears that the installation process has a problem or error as shown below, leave it and click Close.
- Finish, and end by restarting your laptop. Your laptop’s internal keyboard and mouse are active again.
How to Disable Specific Keys on a Laptop Keyboard
This software for deactivating the keyboard button, called KeyTweak, has a tiny size. Besides, to disable specific keys on laptop keyboards, this software can also change the function of a button to another button. For example, replace “shift” button with “enter” button.
You can search this software on Google; the size is tiny and easy to install.
If the installation process is complete, the display of all the buttons in this application uses a numerical index. To find out the position of the letter/button in the software, hover over the keyboard button in the KeyTweak, and wait 1 second, the letter/button will appear according to the laptop.
To disable specific keys on a laptop keyboard, follow the steps below:
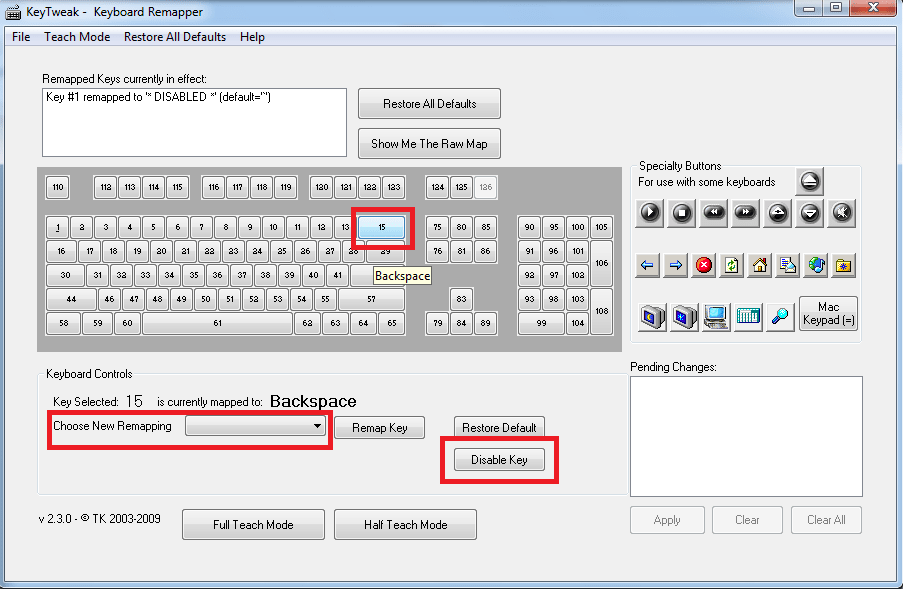
- Open the software by right-clicking the KeyTweak Application, and clicking Run as Administrator.
- Click on the button on the keyboard that you want to disable or replace.
- To disable selected keyboard keys, do click on Disable Key.
- To change the function of the button, click Choose New Remapping, select the replacement button.
- Click Apply, select Yes.
- Your laptop will restart.
How to restore the function of the laptop keys as before?
The way is to open the KeyTweak software again, then click on Restore All Default, then restart your laptop.
Summary
You need to prepare an external keyboard and mouse if you want to disable the laptop keyboard.
Find out which button is damaged, clean the keyboard in that section, or you may use Keytweak to disable specific button.
Well, this is the guide How to Disable Laptop Keyboard in Windows 7, 8, and 10. That’s all.
Hopefully, this article helps you.